


Drawing Landscapes
Tutorial by Diane Wright
- part one
- part two
part one
Landscape - Putting it all together
The Grand Finale
The lessons I have been sharing have focused on specific elements in nature, clouds/skies, rocks, water and trees. Now it is time to put all of these elements together into a complete landscape composition.While plein air offers it's own unique qualities to drawing, it is not always feasible. I prefer to work from photos and in the comfort of my own studio. When I’m out scouring the Iowa countryside ‘barn hunting’, my goal is to compose my landscapes with the use of my digital camera. It is common for me to take as many as 100 or more photos of one barn or of a tree. Every possible angle, close-up and far away are taken – anything to help me as references to use when back in the studio.
Is it okay to use photos just as they are composed? Absolutely. Prior to this digital era, thumbnail sketches were used to compose our artwork. Now much of the compositional issues can be resolved through the lens of the camera or through manipulation in computer photo editing softwares. Most landscape photographs will benefit from minor adjustments to improve the composition and sometimes multiple photographs merged together may be beneficial.
But how do you know what adjustments should be made? What makes a good landscape composition? Here are some tips when working with compositions for landscapes.
- The simplest guide is - if it is pleasing to your eye, it is probably going to be pleasing as a landscape.
- Use the rules of thirds.
- Overlap the elements and make sure they sit on the planes correctly (apply proper perspective)
- Adjust the horizon line for interest. Try a low horizon line for emphasis on the clouds.
- Atmospheric perspective - items in the distance will be lighter and less detailed
- Value composition should be considered as well. Creating a tonal map of the landscape will help unify the landscape. If the darks are scattered throughout the entire scene, it is not going to look as good as balancing the tones.
- Identify the light source. Identify what direction the sun is and apply shadows consistently through out the scene. This applies to overcast days too!
I haven’t gone into much detail on any of these items. Each one could be a lesson on their own! Here are some reference books that go into further depth and illustrations:
- “14 Formulas for Painting Fabulous Landscapes” by Barbara Nuss ISBN: 1-58180-385-0
- “Design & Composition Secrets of Professional Artists” by International Artist Magazine ISBN: 1-929834-09-8
- “Painting Better Landscapes” by Margaret Kessler ISBN: 0-8230-3575-1
- “Drawing Made Easy: Dynamic Composition” by William Powell ISBN:1-56010-998-X
- “Drawing from Line to Life” by Mike Sibley ISBN: 978-0-9551578-0-6
Assignment: Split Rock, Minnesota
What a beautiful photo reference! Betty Wilson has so graciously granted the use of her photograph of a lighthouse located in Split Rock, Minnesota. This image can be located in the Wetcanvas Reference Image Library.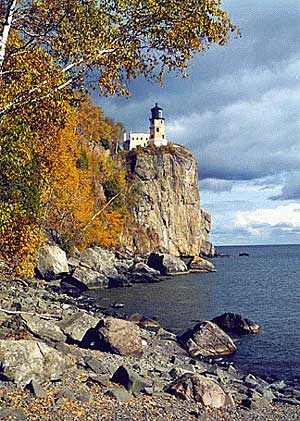
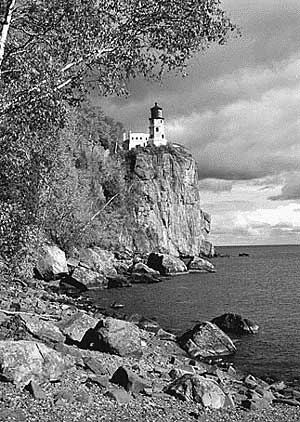
I carefully chose this photo reference to minimize compositional adjusting. Our intent on this assignment is to concentrate on combining our new knowledge on drawing clouds and skies, rocks, water and trees together to make a complete landscape drawing.
So...how do we get started? The important thing is not to be overwhelmed. By dissecting the landscape into sections, you will find your landscape will start magically appearing onto your paper.
So...how do we get started? The important thing is not to be overwhelmed. By dissecting the landscape into sections, you will find your landscape will start magically appearing onto your paper.
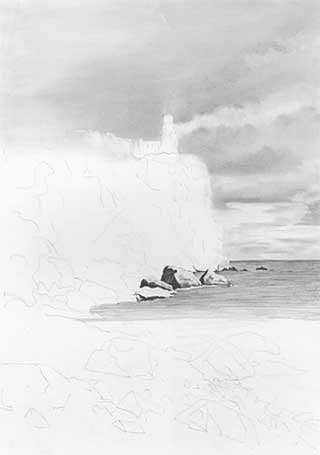
Create an Outline
Draw a light outline on your paper. If necessary, use a light box, tracing paper or projector to get the overall shapes, positioning and placement of the cliff, lighthouse and rocks. As you attack this landscape, review each of the previous lessons, apply those techniques to each section of this scene, and you will be amazed how the landscape will emerge on your paper.STEP BY STEP
 The following is my step-by-step description of my rendering of this
beautiful scene:
The following is my step-by-step description of my rendering of this
beautiful scene: I lightly sketch in an outline of the horizon, bluffs, rocks and lighthouse using a 2H .5 mechanical pencil. I keep the outlines light as they are used only as guidelines.
THE SKY : Using a F lead .5 mm mechanical pencil and the loose-hold hand grip, I cross-hatch multiple evenly applied layers of graphite over the entire sky area. I use a chamois to blend the graphite smooth. I make sure to overlap into the bluffs, behind the trees and into the water area as it is easier to erase the overlap than to fix a missed spot later. The sky tone gradually lightens as it reaches the horizon line, it is the darkest at the top and behind the trees. I “draw” the whitest clouds using a white plastic eraser, erasing the sky. The more subtle areas are lifted out using a Blu-Tack eraser. Additional shading and blending (using a tortillon) is done to create the darker formations.
I use the plastic eraser and a ruler to eraser the over-blending around the edges of the drawing. I also use a fine tipped eraser to erase the lighthouse structure, cliff bluffs and the horizon line.
Where the sky meets the water is the horizon line. In this particular scene, this recession is dark. I do not draw a solid line, but I shade from dark to lighter using short horizontal strokes with an F grade .5 mm mechanical pencil. The strokes become larger and more ‘wavy’ as I continue to the foreground. The rocks are formed using a 2B .5 mech pencil. Since these rocks in the distance, detail is kept to a minimum. I leave a white area between the rocks and the water. This gives the impression of ‘water’ foam and provides just a bit of separation between the two objects.
THE LIGHT HOUSE AND CLIFF:
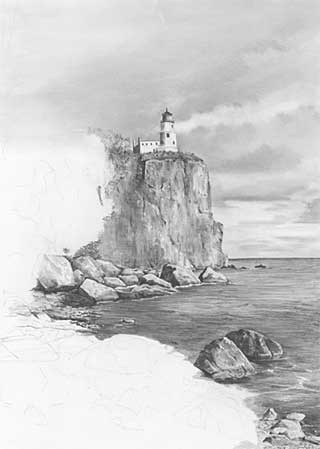 The lighthouse is a simple structure. The sun is kissing its surface, creating both the lightest value (white) in the scene as well as our focal point. I use a HB, .3 mech pencil and draw in the squares for the windows, I shade in the side of the building and create a dark roof on top. Most of the structure is left the white of the paper.
The rock cliff is next. I keep the details fairly indistinct, I use a 2B .5 mechanical pencil to shade in the crevices and some of the details. I then use a 4H chisel edge 2 mm clutch pencil and burnish a layer over the cliff. Blu-tack is used to lift out highlights where the sun is hitting the surface.
Foliage is added between the lighthouse and the cliff. Using the under-hand pencil grip and a scribble pencil stroke, the foliage is quickly drawn in using F 0.5 mm mechanical pencil.
I continue on with the large boulders on the shoreline. Creating angular planes on the rocks and consistent shading to the left of the rocks provide consistency and give the illusion of rocks. The darkest area in the water is at the shoreline. I use a HB .5 mech pencil in this area. Smaller rocks glisten in the sunlight at the shoreline. Drawing only the shadows of the rocks (negative drawing) makes easy work of them!
The two rocks in the water in the foreground are dark and richly textured. I use a 2B mechanical pencil to shade them in, then burnish with an additional layer using 2H chisel point clutch pencil to create the rich dark tones. A touch of a battery-operated eraser creates the highlights of the sun hitting the rocks.
- part one
- part two